As good as The Oculus Quest 2 already is for a number of reasons another great thing about it is that you can connect oculus quest 2 to PC and play PCVR games too. So, let’s go over some ways to connect Oculus Quest 2 to PC.

Connect oculus quest 2 to pC
Unlike other VR headsets that require cables to connect to a PC, the Quest 2 is entirely wireless. This means that users can move around freely without worrying about tripping over cords or being limited by the length of the cable.
The wireless feature is especially important for games that require a lot of movement, such as Beat Saber or Superhot. With Quest 2, users can fully immerse themselves in the game without any distractions.
Another benefit of the wireless feature is that it allows for more social interaction. With other VR headsets, users are tethered to a PC, which can make it difficult to interact with others in the same room. With the Quest 2, users can move around freely and interact with others without being limited by cables. This opens up a whole new world of possibilities for social VR experiences.

Quest 2 is a fully standalone device, which means that users don’t need to have a PC or gaming console to use it. This is a huge advantage for those who don’t have a high-end PC or gaming console. With the Quest 2, users can experience high-quality VR without having to invest in expensive hardware.
The standalone PC feature also makes it easy to use the Quest 2 on the go. Users can bring the headset with them anywhere and experience VR without needing to set up a PC or gaming console. This is perfect for those who want to experience VR while traveling or visiting friends and family.
Navigate To:
Connect oculus Quest 2 to PC with a cable (Oculus Link)
If you want to experience PC-based virtual reality on your Oculus Quest 2 headset, you can use the Oculus Link feature, which allows you to connect your headset to a PC using a USB-C cable. In this article, we will walk you through the steps to connect your headset with a cable in a conversational style.
Step 1: Check your PC specs
Before you start connecting your Quest 2 to your PC, make sure your computer meets the Oculus Link system requirements. The recommended specs are at least an NVIDIA GTX 970 or AMD Radeon R9 290 graphics card, an Intel i5-4590 or AMD Ryzen 5 1500X processor, at least 8GB of RAM, and Windows 10.
Step 2: Get a compatible cable
You will need a USB-C cable to connect oculus Quest 2 to PC. Make sure it is a high-quality cable that is at least 3 meters long. Oculus recommends using the official Oculus Link cable or a third-party cable that is certified for Oculus Link.


Step 3: Enable Oculus Link on your Quest 2
To enable Oculus Link on your Quest 2, put on your headset and navigate to the Settings menu. Select the Devices tab and then enable the Oculus Link option. Your headset will now be in Link mode.
Step 4: Connect your Quest 2 to your PC
Connect one end of the USB-C cable to your Quest 2 headset and the other end to your PC. Make sure your PC recognizes the headset and installs any necessary drivers.
Step 5: Launch the Oculus app
Launch the Oculus app on your PC and make sure you are logged in to your Oculus account. Your Quest 2 should appear as a device in the Devices tab of the app.
Step 6: Start playing PC-based VR games
Now that your Quest 2 is connected to your PC, you can start playing PC-based VR games. Navigate to the PC VR section of the Oculus Store to download and install compatible games. Once installed, put on your headset and navigate to the Library tab to start playing.

If you want to know about the link cables in more detail, read this article about top 7 best link cables for Oculus Quest 2.
How to enhance the performance of your Oculus Quest 2
Let’s walk you through some tips to help you get the most out of your Oculus Quest 2.
Tip 1: Adjust the graphics settings
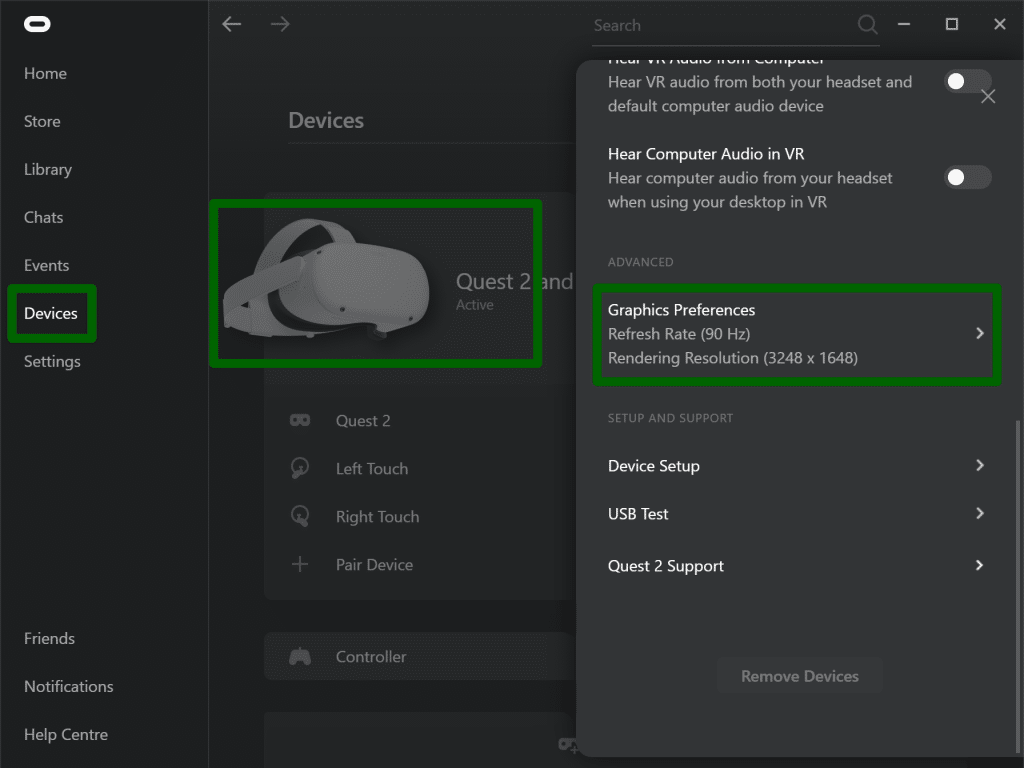
One of the easiest ways to enhance the performance of your Oculus Quest 2 is by adjusting the graphics settings. Lowering the graphics quality can help reduce the workload on your headset and improve overall performance. To do this, go to the Settings menu in your Quest 2 and select the Graphics tab. From there, you can adjust the graphics quality to optimize performance.
Read more on how to get the best quality and performance for Your oculus quest 2
Tip 2: Clear your headset’s storage
The Quest 2 has limited storage space, and if you have too many apps or games installed, it can affect the performance of your headset. To free up space and improve performance, you can remove apps or games that you don’t use or need. You can do this by going to the Library tab in your Quest 2, selecting the app or game you want to remove, and then selecting Uninstall.
Tip 3: Keep your headset updated
Regularly updating your Quest 2 software can help improve performance and fix any bugs or issues. To check for updates, go to the Settings menu in your Quest 2 and select the About tab. From there, you can check for updates and install them if they are available.
Tip 4: Use the Oculus Link feature
If you want to experience PC-based virtual reality on your Quest 2, you can use the Oculus Link feature. This allows you to connect your headset to a PC using a USB-C cable and experience high-quality VR. By using the Oculus Link feature, you can take advantage of the more powerful hardware of your PC and enhance the performance of your Quest 2.
Tip 5: Close unused apps
If you have multiple apps or games open on your Quest 2, it can affect the performance of your headset. To improve performance, you can close any unused apps or games. To do this, press the Oculus button on your controller to open the Oculus menu, and then select the app or game you want to close. From there, select Quit to close the app or game.
How to connect Oculus Quest 2 to PC wirelessly via AirLink
This feature allows you to play PC-based virtual reality games and apps without being tethered to your computer. In this article, we will explore how to wirelessly connect your Oculus Quest 2 to your PC in a casual tone and conversational style.
Step 1: Check your PC specs
Before you start the wireless connection process, you need to make sure your PC meets the Oculus Air Link system requirements. The recommended specs are at least an NVIDIA GTX 1070 or AMD Radeon RX 580 graphics card, an Intel i5-4590 or AMD Ryzen 5 1500X processor, at least 8GB of RAM, and Windows 10.
Step 2: Enable Air Link on your Quest 2
To use Air Link, you need to enable it on your Oculus Quest 2 headset. To do this, put on your headset and navigate to the Settings menu. Select the Experimental Features tab and then enable the Air Link option. Your headset will now be in Air Link mode.
Step 3: Connect your Quest 2 to your Wi-Fi network
Make sure your Quest 2 is connected to the same Wi-Fi network as your PC. If you are not sure how to connect to a Wi-Fi network, go to the Settings menu on your Quest 2 and select the Wi-Fi tab. From there, you can connect to your Wi-Fi network by entering your network name and password.
Step 4: Launch the Oculus app on your PC
Launch the Oculus app on your PC and make sure you are logged in to your Oculus account. Your Quest 2 should appear as a device in the Devices tab of the app.
Step 5: Turn on Air Link on your PC
To turn on Air Link on your PC, click on the Devices tab in the Oculus app and select your Quest 2 headset. From there, you can turn on Air Link by selecting the Air Link option. Your PC will now be in Air Link mode.
Step 6: Start playing PC-based VR games
Now that your Quest 2 is wirelessly connected to your PC, you can start playing PC-based VR games. Navigate to the PC VR section of the Oculus Store to download and install compatible games. Once installed, put on your headset and navigate to the Library tab to start playing.
Tips for optimizing your wireless connection for a better Oculus VR connection
- Make sure your Wi-Fi network is strong and stable. If your network is weak or unstable, it can affect the quality of your wireless connection and cause lag or other performance issues.
- Keep your headset and PC in the same room. The closer your headset and PC are to each other, the better the wireless connection will be.
- Use a 5GHz Wi-Fi network. 5GHz networks are generally faster and more stable than 2.4GHz networks, which can help improve your wireless connection.
- Use a Wi-Fi extender if necessary. If your Wi-Fi network does not reach the room where your PC is located, you can use a Wi-Fi extender to boost the signal and improve your wireless connection.
Windows 11 issue with Oculus Quest 2
Some users have reported issues with using it on Windows 11. In this article, we will explore the Windows 11 issue on the Oculus Quest 2 in a conversational style and discuss possible solutions.
The issue with using the Oculus Quest 2 on Windows 11 is that the Oculus app may not work properly. Some users have reported that the app crashes or fails to load when trying to use it on Windows 11. This can be frustrating for users who want to enjoy their VR experiences on their PC.
Possible solutions
There are several solutions that users can try to fix the Windows 11 issue with the Oculus Quest 2.
- Solution 1: Update the Oculus app
The first solution is to update the Oculus app to the latest version. This can be done by opening the app and checking for updates in the Settings menu. If an update is available, download and install it. This may fix any compatibility issues with Windows 11.
- Solution 2: Reinstall the Oculus app
If updating the app does not work, try uninstalling and reinstalling the Oculus app. This can be done by going to the Settings menu and selecting the Apps & features tab. Find the Oculus app and select Uninstall. Once uninstalled, go to the Oculus website and download the latest version of the app. Install it on your PC and try using it again.
- Solution 3: Run the app in compatibility mode
Another solution is to run the Oculus app in compatibility mode for an earlier version of Windows. To do this, right-click on the Oculus app icon and select Properties. In the Properties menu, select the Compatibility tab and check the box that says “Run this program in compatibility mode for.” Select an earlier version of Windows, such as Windows 10, and click Apply. This may fix any compatibility issues with Windows 11.
- Solution 4: Use the Oculus Link cable
If none of the above solutions work, users can try using the Oculus Link cable instead of wirelessly connecting to their PC. The Oculus Link cable connects the Quest 2 directly to the PC, bypassing any issues with the wireless connection or app compatibility.
Read Also:
Why is my VR so laggy? 12 causes and solutions.
How to fix: Oculus Quest Air Link lag and stutter